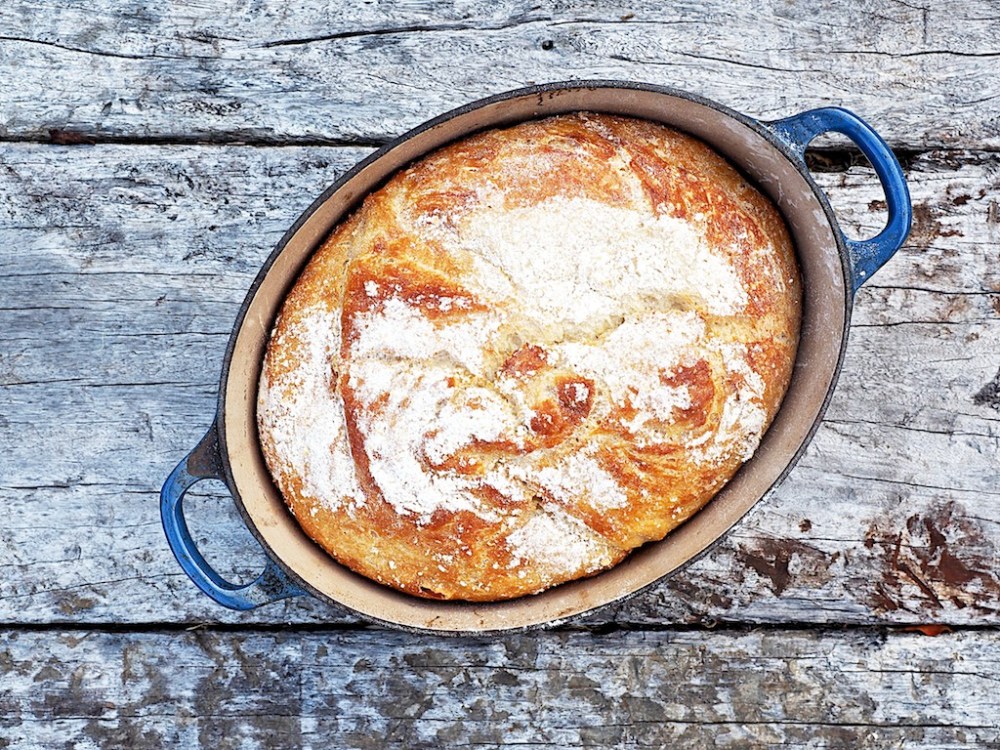
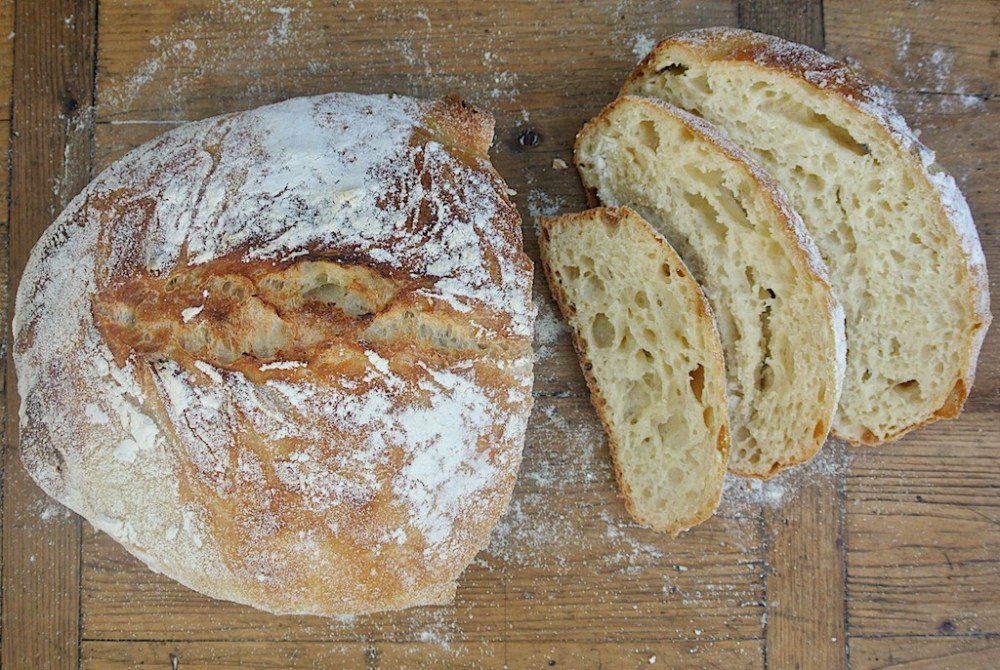
“What?? Is she going mad?” You are probably wondering. No, I haven’t lost my mind, my friends. In my recent bread-making frenzy, I have come across an ancient, wondrous recipe that will turn each one of you into an Artisanal Baker. In Italy this bread used to go by the name of Pane Cafone, boorish bread, but it was only in 2006 , when Jim Lahey shared his formula for this miraculous breadmaking technique, that something like 8 million food bloggers world wide have gone mad about it and have baked it , and blogged about it incessantly. Honestly, this is so easy that I had my 4 year-old Raffi mix a loaf a few days ago. The end product looked like this:
Now that I have your attention…
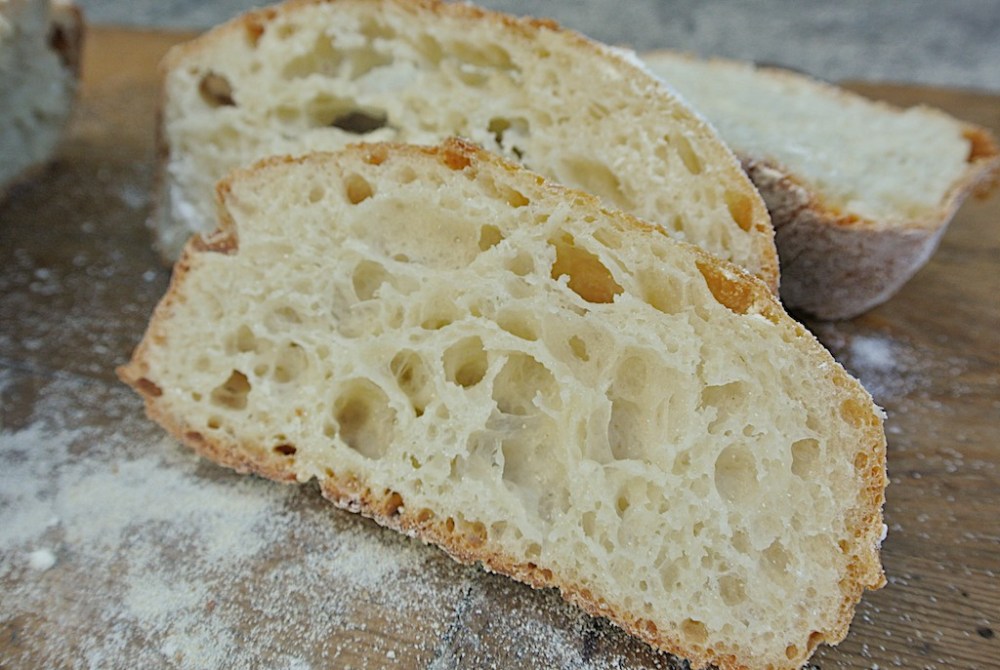
The principle behind this recipe is that if you mix your ingredients just so they are amalgamated and you let the mixture prove for a very, and I mean very, long time, it will turn into a bubbly, light-as-a feather dough. Because you won’t knock the air out by kneading, those same bubbles will stay trapped in the dough resulting in a crusty loaf with a moist, soft and airy crumb. Genius, if you ask me. Because of the long proving required, I would suggest you make the mixture at night before you go to bed and bake the next day. I have adapted Jim Lahey’s recipe to suit my oven and my personal taste, and I proudly confess I have not bought a single loaf of bread for over a year now.
Ingredients (if using dry yeast)
450 g (3-3/4 cups) All purpose flour
350 ml (1 -1/4 cups) filtered water, at room temperature
1/2 scant teaspoon dry yeast
2 teaspoons of salt
If using your own sourdough starter home-made-sourdough
400 gr (3 1/4 cups) All purpose flour
280 ml (3/4 cups) filtered water at room temperature
200 gr (7 oz)starter
2 teaspoons of salt
Semolina for dusting
How to
1. Mix flour, water and yeast together with a wooden spoon until combined.
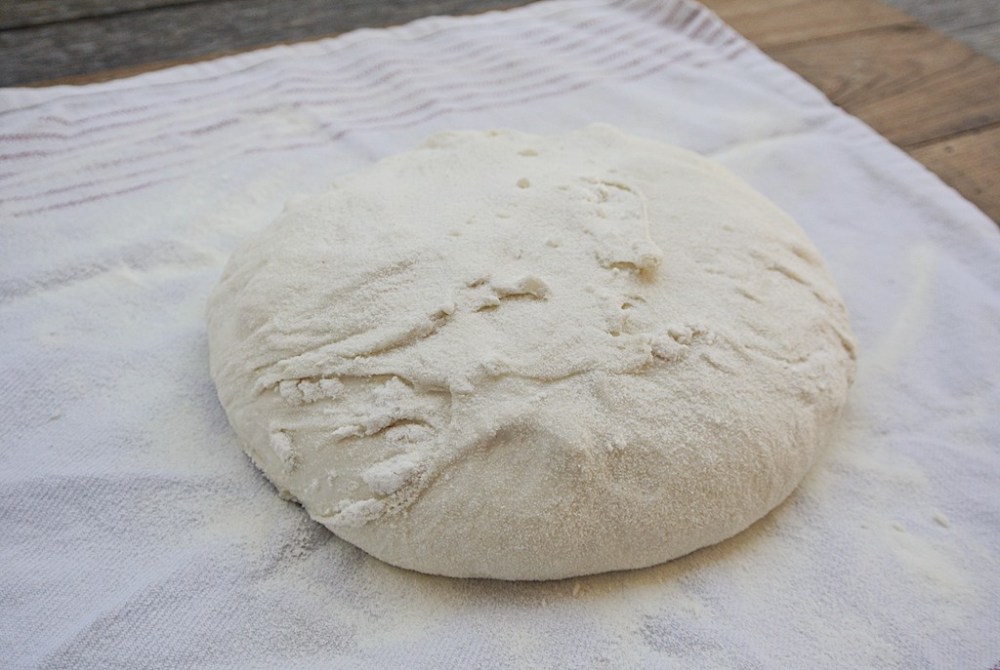
2. Add salt and mix again. Your mixture will look and feel quite sticky. Cover the bowl with cling wrap and let it prove for 10/14 hours, or until it’s grown three times bigger and looks bubbly.
3. Dust your cooking bench and your hands with flour and try to shape the sticky mix into a ball. Let it rest for 1 1/2 hours, wrapped in a kitchen towel generously dusted with semolina flour.
4. Turn the oven to 220 C (430 F).
5. Put in a cast iron pot or a dutch oven, without the lid, to heat up for about 40 minutes
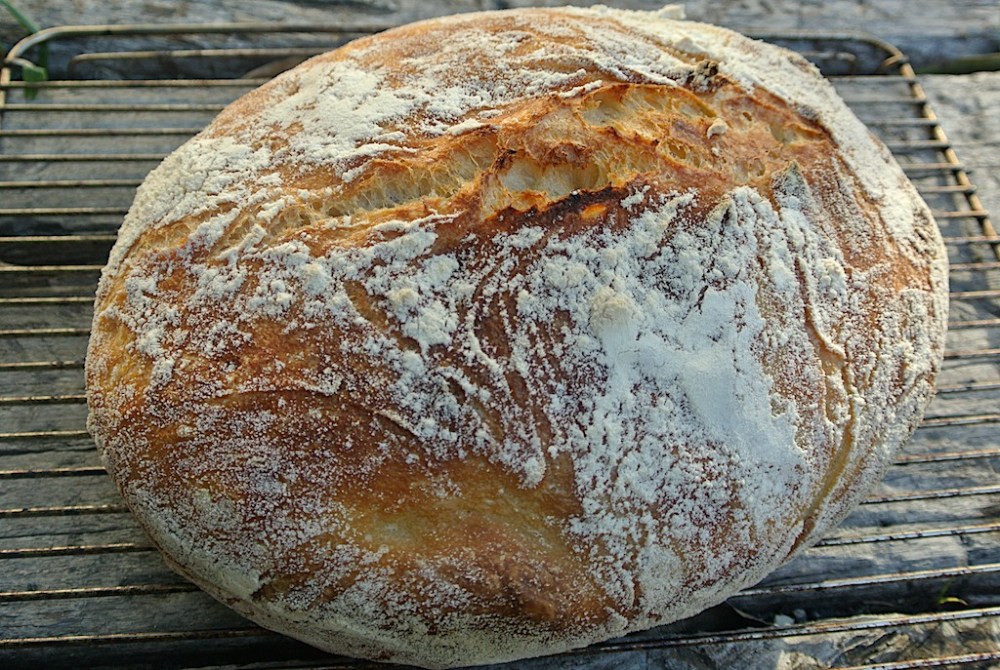
6. Gently tip the risen dough in the pre-heated pot, cover with the lid and bake for 25 minutes. Please, use oven mitts!
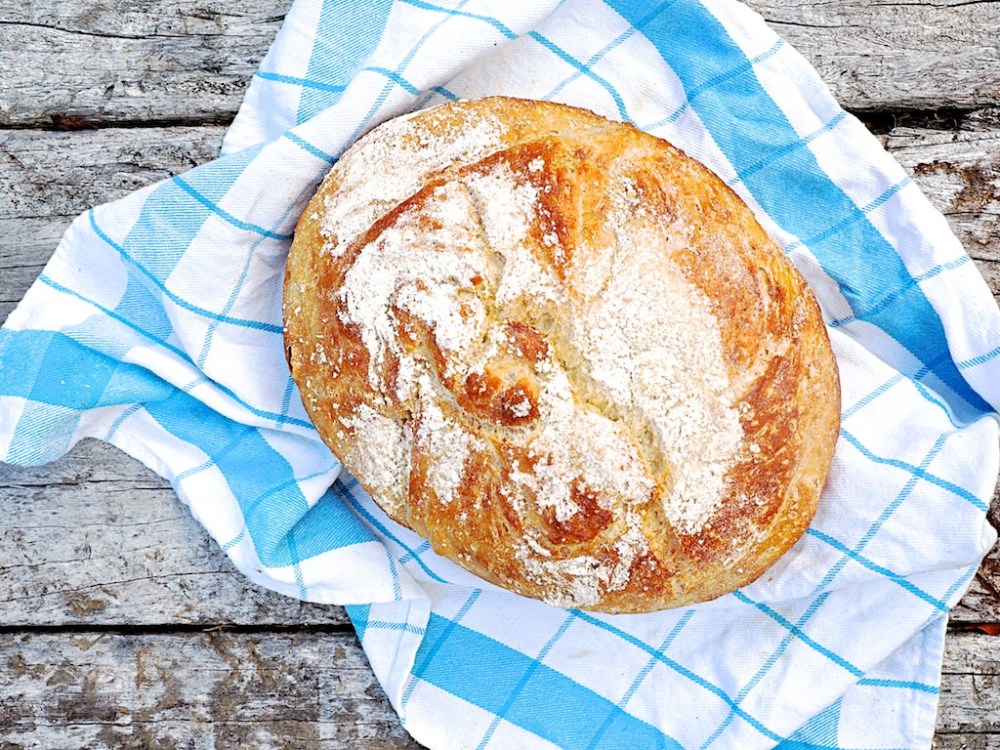
7. Take the lid off and bake for another 10/15 minutes or until it looks crusty and browned. Take the pot out of the oven and let the bread come to room temperature before you slice it.
ECCO!
Silvia’s Cucina is on Facebook , Twitter and Pinterest
Silvia’s Cucina the cookbook is available in stores and online

Related articles
- Colomba : an Italian Easter Bread, with Prosecco and Chocolate chips (silviascucina.wordpress.com)
- Walnut Sourdough (bewitchingkitchen.com)
- by bread alone (halibedragons.wordpress.com)

Hello Silvia, loved the method of making this bread. Tried it today but it did not cook well. It was very doughy and heavy. What did I do wrong? I followed the instructions perfectly? Would love to bake it again, whats your tip. Thanks
Hi Donietta, I’m sorry it didn’t work!
When I was fist testing the recipe, I’ve had a couple of failures due to:
1. The dough was too wet, it rose well, but when I put into the heated pot, it deflated and flattened. If your dough is too wet, add a bit more flour to the mix. Your dough should be a little sticky, but still come away from the bowl easily with a spatula.
2. The dough was too dry. In this case, add a teeny bit more water.
3. In cold weather , you can let the dough prove for up to 18 hours. In hot climate, 3 hours should be enough.
4. Always use filtered water at room temperature
5. If you can find if use half plain “o” flour and half Manitoba, it will give the dough an upward lift.
Let me know!!
X
Silvia
Hello Silvia, I’ve made the bread twice this week and have my third loaf proving overnight now. It turned out beautifully and as you’ve mentioned to Donietta, I’ve adjusted ingredients as needed. Also found that leaving it in the pot until completely cooled was essential as I took it out almost straight away the second time and it was just slightly doughy, so I’m assuming it still ‘cooks’ a little while resting in the pot. Thanks, it’s my first attempt at bread and I love it. Also trying your lemon cake tomorrow. Thanks for some simple yet lovely recipes. Jenni.
Oh, you did so well then! I always leave the bread to cool in the pot for a few minutes, then I lift halfway out to avoid the bottom to go soggy. So glad the recipe works for you!
hi silvia, do you have to cook this in a iron pot or can you use something else. Also just checking the amount of yeast to use is just 1g (1/3rd teaspoon) am i correct, thank you very much, Charlotte.
HI Charlotte,
yes I use a cast iron pot with a lid. You can use any pot with lid, just make sure there are no plastic parts! I know the quantity of yeast seems so little, but because you will prove the dough for such a long time, it will only require that much. Part of the rising agent is the fermentation caused by the long proving. It’s a beautiful bread. I hope you like it! Remember the texture of the dough should be a little sticky, but not too wet, so adjust the quantity of flour and water accordingly. Each flour is slightly different and I sometimes have to add a splash more water of a handful of flour to make it right.
Have fun !
I grew up in Germany..this is how the little “Brotchen” (little breads) were made..I remember walking in German friends houses and finding the little loaves “proving” on cabinet and dresser tops over night…
I make this bread all the time but I use even less yeast – only quarter to half teaspoon – and it is great. I have been given a mother sourdough starter and it has taken over my life. So pleased to see your sourdough version of this easy delicious bread so I will now be able to use the starter. I am still not used to throwing part of it away when I refresh it…hate throwing any food away!!
Hi Carol ! How exciting to have some sourdough! Wait and see, the bread is divine….
Have tried that method many times already and always I have troubles with removing the baked bread from the pot. Have got 3 recipes for it, yours is the forth. I baked it in various pots and trays, including cast iron, preheated it right according to the recipe and the result is always the same: terrible troubles with removing. Could you give me any advice?
Just bought a dutch oven and am planning to make this this weekend. Have you ever added in anything like cheese, seeds, peppers or other seasonings?
Yes, I often mix in Chia seeds or top the bread with sesame seeds.
Did you really bake the bread in that hot an oven or did you turn the oven off aster the pot was heated T that high a temp?.
Hi Brenda,
yes, you heat up the pot, put the bread dough in, lid on and into a very hot oven for 30 minutes. Then take the lid of and continue baking for about 15 minutes or until golden and crusty. Good luck!
I made it many times but I use about 1/3 of rye flour. It’s great! The only problem I had was I couldn’t remove the loaf from the pot as the it was stuck to the bottom. I asked many cooks for an advice and was told to heat up the oven properly. But even I did it, i had troubles. Then I found a blog by some American cook and he wrote so that the dough would be put on a square of baking parchment when you form a loaf and let it rise on it; then put it to the pot together with this paper. I tried it and it worked! So now I always use the parchment.
How bizarre! This has never happen to me and I never use parchment paper. I heat up the pot for a good 40 minutes, then dust the bottom with semolina, to make sure it’s non-stick. Did yo try this?
I made it yesterday and was totally amazed! It was like the bread my grandmother used to make! So thrilled to have this recipe. For people who don’t have a dutch oven; can they make this bread on a pizza stone or do you have to have a pot with a lid?
Linda, you make me so happy! As long as there are no plastic parts, any pot with a fitted lid will work.
This really is actually fascinating, That you are a quite specialist blogger. Ive joined your rss feed and sit up for looking for more of your excellent post.
Oh, thanks so much for your message!
Hi Silvia,
I just discovered your blog and want to try this bread.
Can please tell me, how big the pot is size wise.
Thank you
Julia
Hi Julia,
my pot is just like this one http://www.teddingtons.com.au/le-creuset-cobalt-blue-29cm-oval-french-oven-casserole?gclid=Cj0KEQjw6pGfBRD09M-TmYTBzqIBEiQAcRzH59aj9lNB0OC-vDK1GPfXWJbiuDqN5vPy1JRL-pY8ApcaAs1Q8P8HAQ
Hope this helps!
Silvia
Hi Silvia,
Thank you for the explanation.
Unfortunately my pot is smaller than yours.
As I really want to try to make this bread, I will invest in this pot.
Regards
Julia
Hi Julia,
You should know that the pot on the link is probably top of the range. You can get cheaper brands that are still very good. Also, you can still bake the bread on a tray lined with baking paper and it will be almost as good.
Regards
Silvia
Dear Silvia,
I bought the same pot(red) as yours and mafe the bread according to your recipe, but the bread didn’t rose at all…please can you advise me how to avoid this in the future?
Regards Julia
Dear Julia,
I am so sad to hear it didn’t work. It is so unfortunate as this is a really easy recipe that everyone loves. There may be a few reasons the bread didn’t rise. Did you check the expiration date on your dry yeast packet? If it’s past it, it is likely not to work. Was the yeast in close contact with the salt? Salt can deactivate yeast, so you have to mix flour, yeast and water fist and then add the salt. What was the temperate of the water? Warm to hot water will kill the yeast. I hope you give it another go. Please don’t hesitate to contact me if you need further advise.
Silvia
It’s awesome to go to see this site and reading the views
of all friends concerning this post, while I am
also eager of getting familiarity.
Dear Silvia
I have been trying to get this result when making bread and your recipe has helped me achieve that, thanks so much, I’m so happy. My husband and two boys can’t get enough. Have also enjoyed your program on SBS as my parents are from Molise. Love your recipes.
Regards Rosanna
Do you ever use brown flour or spelt flour?
Yes, indeed, they work beautifully with this type of preparation
Wow that looks good. And easy
IT IS ABSOLUTELY FANTASTIC !!!!!
Ciao Silvia Oggi ho fatto il pane e venuto stupendo Grazie tanto 😘
Been making the yeasted version of this for ages and just mixed up a batch with my sourdough and was wondering why the dough was so dry, just a typo in the water measurement, I went by the 3/4 cup and then noticed that this is actually only 180ml, not the 280 ml required.
Try add more water next time. With flours, there is always room to tweak a little!
Thank you for this! I was having problems working out the water amount and I thought, I’ll read the comments! Just about to try 😊
Great!
Hi Silvia, I am trying this recipe for the first time & accidentally read the amount of dry yeast wrongly & put in a scant teaspoon of dry yeast. The dough seems to be rising pretty quickly & it is a very warm day here as well. It will have tripled in size well before 10hrs so I will turn out & shape the let proof for an hour & half before cooking. Hopefully it turns out ok.
Sorry bout this late reply. I hope the bread turned out ok! In warmer weather it rises much more quickly!
Ciao Silvia. I am dying to try this – but I think my Le Creuset is a size or two down from yours. Should I adjust the ingredients accordingly (ie. reduce everything by a third?). Grazie mille, Joe.
Possibly, but keep the yeast the same amount. Good luck!
I have made this bread from another of different recipes – I forgot I had yours to read! My problem seems to be the need of when to add the flour and how wet it should be when you take it out to shape. If it’s too wet then can you add flour at this point or just try to make a ball. I’m always concerned about how strong a ball it is whether it should be tight enough to hold together more clearly. I’d like to know too when I should add in additional embellishments like dried fruit or nuts, and too if after it’s taken out you can split the dough into 2 balls instead of one. Thank you so much!
Yes, you can flour your hands to shape the dough, it’s perfectly fine and if you ant to add nuts or olives, do it before you shape it. Same thing if you want to cut the dough into two
Thanks for an excellent blog. I’ve been happily using this recipe and technique for years, and am puzzled by the number of people who are having trouble with it. The recipe is nearly foolproof, even for an amateur like me! For those who find it soggy or dense, try a hotter oven (230 C) and a minimum bake time of 30 minutes covered, 15 minutes uncovered. People may find the video at https://youtu.be/13Ah9ES2yTU helpful. I’m looking forward to trying your gluten-free recipe with Fioreglut flour, having recently come to suspect that gluten is a problem for me. Hopefully it will let me return to bread as delicious as this recipe!
Thanks so so much Barbara!!
I have made the no-knead bread twice now, once using 3 cups organic plain flour with 3/4 cup wholemeal spelt, and the second time 3 cups organic plain flour with 3/4 cup Buckwheat. Very yummy indeed and amazing how this recipe turns breadmaking technique upside down. I did find it a bit of a juggle transferring the dough into the pot as it was very delicate. Would appreciate any tips if you have any. I did flour my hands and the dough to make it easier.